 实现一个合成雪碧图的loader
# 前言
前面我们描述了如何实现一个简单的
loader,本文将通过一个实战--合成雪碧图,更深入的去体验一下一个loader的实现过程。
# 准备
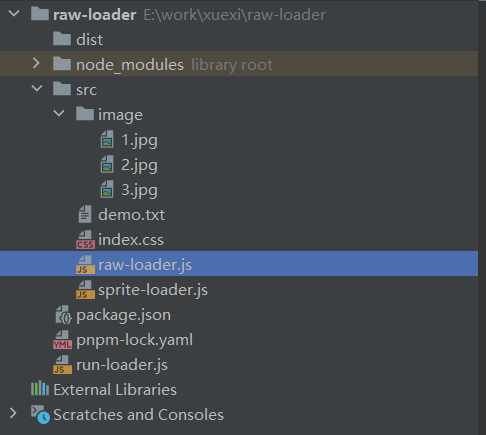
首先我们要做一下准备工作,准备几张图片。然后新建立一个项目,安装loader的运行环境loader-runner这个库(这个库是专门用来测试loader用的,可以无需依赖webpack环境直接运行loader)

准备好上面的目录,开干
# spritesmith
spritesmith是一个合成雪碧图的工具库,下面简单演示一下他的用法
const Spritesmith = require('spritesmith');
const path = require('path')
const fs = require("fs");

const sprites = [
    path.join(__dirname,'./image/1.jpg'),
    path.join(__dirname,'./image/2.jpg'),
    path.join(__dirname,'./image/3.jpg'),
];
Spritesmith.run({src: sprites}, function handleResult (err, result) {
    console.log(result,err)
    fs.writeFileSync(path.join(__dirname,'../dist/sprite.jpg'),result.image)
    // result.image; // Buffer representation of image
    // result.coordinates; // Object mapping filename to {x, y, width, height} of image
    // result.properties; // Object with metadata about spritesheet {width, height}
});
2
3
4
5
6
7
8
9
10
11
12
13
14
15
16
用法也非常的简单,只需要调用run方法,传入一个图片数组,就可以了。在reslut里面我们能拿到合成后的图片buffer,以及图片的一系列信息,具体的这里就不贴图了,可以看看官网的示例 (opens new window)
# sprite-laoder
熟悉了雪碧图如何生成,下面就来看看这个loader怎么写吧。
在学习了前面的内容之后,我们能很清楚的明白,其实loader就是一个函数。webpack会在调用这个函数的时候把当前文件的字符串传入(当然也可以选择接收buffer)。我们只需要对他进行操作,最后return出去就可以了
这样一来,我们的loader雏形就出来了
const Spritesmith = require('spritesmith');
const path = require('path')
const fs = require("fs");

module.exports = function (source){
    const callback = this.async()
    const imgs = source.match(/url\((\S*)\?__sprite/g)
    const matchedImgs = []
    imgs.forEach(d=>{
        const img = d.match(/url\((\S*)\?__sprite/)[1]
        matchedImgs.push(path.join(__dirname,img.slice(1,img.length)))
    })
    callback(err,source)
}
2
3
4
5
6
7
8
9
10
11
12
13
14
上面的操作,其实就是在匹配我们的source中所有的图片路径,然后经过处理之后将他添加到一个数组中。
现在图片收集到了,我们要做的就是去调用spritesmith这个库合成一下,然后将合成后的图片路径替换掉原来的就可以了
// sprite-loader.js
module.exports = function (source){
...
    Spritesmith.run({src: matchedImgs}, function handleResult (err, result) {
    console.log(result,err)
    fs.writeFileSync(path.join(process.cwd(),'dist/sprite.jpg'),result.image)
    source = source.replace(/url\((\S*)\?__sprite/g,(match)=>{
        return `url("dist/sprite.jpg`
    })

    fs.writeFileSync(path.join(process.cwd(),'dist/index.css'),source)
    callback(err,source)
});
}
2
3
4
5
6
7
8
9
10
11
12
13
14
下面我们来写个loader-runner测试一下
//run-loader.js

const {runLoaders} = require('loader-runner')
const fs = require('fs')
const path = require('path')

runLoaders({
    resource:path.join(__dirname,'./src/index.css'),
    loaders:[
        path.join(__dirname,'./src/sprite-loader.js')
    ],
    content:{
        minimize:true
    },
    readResource:fs.readFile.bind(fs)
},(err,result)=>{
    err?console.log(err):console.log(result)
})
2
3
4
5
6
7
8
9
10
11
12
13
14
15
16
17
18
19
这里我们还要准备一个index.css。也就是我们要操作的文件
/*//index.css*/
.bg1{
    background: url("/image/1.jpg?__sprite");
}
.bg2{
    background: url("/image/2.jpg?__sprite");
}
.bg3{
    background: url("/image/3.jpg?__sprite");
}
2
3
4
5
6
7
8
9
10
运行我们的run-loader.js看看结果吧


# 总结
经过以上的实践,相信大家对loader的编写印象会更深了。总的来说loader就是非常简单的一个函数,webpack提供给你文件的内容,你在loader里对他操作。操作完return出去就行了