 深入keep-alive
##keep-alive
keep-alive是vue提供的一个缓存组件的组件,他可以使被缓存的组件不被卸载,而是保存在内存中,下次渲染直接从缓存中读取这个组件,在实际工作中可是一把利器。
##如何使用
keep-alive本质上是vue提供的一个组件,在使用上,只需要将被缓存的组件使用keep-alive包裹起来即可,同时keep-alive接收三个props
,分别是
include:可传字符串、正则表达式、数组,名称匹配成功的组件会被缓存exclude:可传字符串、正则表达式、数组,名称匹配成功的组件不会被缓存max:可传数字,限制缓存组件的最大数量
// 动态组件
<keep-alive :include="allowList" :exclude="noAllowList" :max="amount">
    <component :is="currentComponent"></component>
</keep-alive>

// 路由组件
<keep-alive :include="allowList" :exclude="noAllowList" :max="amount">
    <router-view></router-view>
</keep-alive>
2
3
4
5
6
7
8
9
# 源码
下面就一起从源码层面来深入学习一下keep-alive
# 组件基础部分
// src/core/components/keep-alive.js

export default {
  name: 'keep-alive',
  abstract: true, // 判断此组件是否需要在渲染成真实DOM
  props: {
    include: patternTypes,
    exclude: patternTypes,
    max: [String, Number]
  },
  created() {
    this.cache = Object.create(null) // 创建对象来存储  缓存虚拟dom
    this.keys = [] // 创建数组来存储  缓存key
  },
  mounted() {
    // 实时监听include、exclude的变动
    this.$watch('include', val => {
      pruneCache(this, name => matches(val, name))
    })
    this.$watch('exclude', val => {
      pruneCache(this, name => !matches(val, name))
    })
  },
  destroyed() {
    for (const key in this.cache) { // 删除所有的缓存
      pruneCacheEntry(this.cache, key, this.keys)
    }
  },
  render() {
      // 下面讲
  }
}
2
3
4
5
6
7
8
9
10
11
12
13
14
15
16
17
18
19
20
21
22
23
24
25
26
27
28
29
30
31
32
# pruneCacheEntry
在组件的destroyed声明周期里可以看到,他遍历了cache,并逐一执行pruneCacheEntry函数,让我们来看看pruneCacheEntry函数里都做了些啥吧
// src/core/components/keep-alive.js

function pruneCacheEntry (
  cache: VNodeCache,
  key: string,
  keys: Array<string>,
  current?: VNode
) {
  const cached = cache[key]
  if (cached && (!current || cached.tag !== current.tag)) {
    cached.componentInstance.$destroy() // 执行组件的destory钩子函数
  }
  cache[key] = null  // 设为null
  remove(keys, key) // 删除对应的元素
}
2
3
4
5
6
7
8
9
10
11
12
13
14
15
总结一下,主要干了以下几件事儿
- 执行每个组件的`````$destroy```声明周期
- 清空
cache中对应的组件,并删除kes中对应的key
# render
下面来重点解析一下render函数,首先上源码
// src/core/components/keep-alive.js

render() {
  const slot = this.$slots.default
  const vnode: VNode = getFirstComponentChild(slot) // 找到第一个子组件对象
  const componentOptions: ?VNodeComponentOptions = vnode && vnode.componentOptions
  if (componentOptions) { // 存在组件参数
    // check pattern
    const name: ?string = getComponentName(componentOptions) // 组件名
    const { include, exclude } = this
    if ( // 条件匹配
      // not included
      (include && (!name || !matches(include, name))) ||
      // excluded
      (exclude && name && matches(exclude, name))
    ) {
      return vnode
    }

    const { cache, keys } = this
    const key: ?string = vnode.key == null // 定义组件的缓存key
      // same constructor may get registered as different local components
      // so cid alone is not enough (#3269)
      ? componentOptions.Ctor.cid + (componentOptions.tag ? `::${componentOptions.tag}` : '')
      : vnode.key
    if (cache[key]) { // 已经缓存过该组件
      vnode.componentInstance = cache[key].componentInstance
      // make current key freshest
      remove(keys, key)
      keys.push(key) // 调整key排序
    } else {
      cache[key] = vnode // 缓存组件对象
      keys.push(key)
      // prune oldest entry
      if (this.max && keys.length > parseInt(this.max)) { // 超过缓存数限制,将第一个删除
        pruneCacheEntry(cache, keys[0], keys, this._vnode)
      }
    }

    vnode.data.keepAlive = true // 渲染和执行被包裹组件的钩子函数需要用到
  }
  return vnode || (slot && slot[0])
}
2
3
4
5
6
7
8
9
10
11
12
13
14
15
16
17
18
19
20
21
22
23
24
25
26
27
28
29
30
31
32
33
34
35
36
37
38
39
40
41
42
43
分析:
- 首先获取
默认插槽中的内容以及第一个子组件的vnode - 如果组件的配置项存在的话,则开始判断
include和exclude存在与否以及子组件的名称是否在名单中,如果不存在则直接返回子组件的vnode,不做缓存处理 - 如果子组件
需要缓存的话则开始进行缓存操作,生成组件专属的key,并判断是否已经缓存过该组件,如果缓存过则直接从缓存里取,并且调整组件在缓存中的顺序,将组件放置最后,也就是LRU算法(缓存淘汰策略), - 如果组件
没被缓存过,则将他进行缓存,并且对max进行判断,超出数量则删除第一个被缓存的组件。 - 最后将组件的
KeepAlive属性设置为true
# 渲染
先来大致解读一下一个vue组件的渲染
render函数会讲编译好的组件转成vnodepatch会根据拿到的vnode开始生成真实dom,而第二次patch则会用新旧vnode进行比对,diff算法也就是在这个时候触发的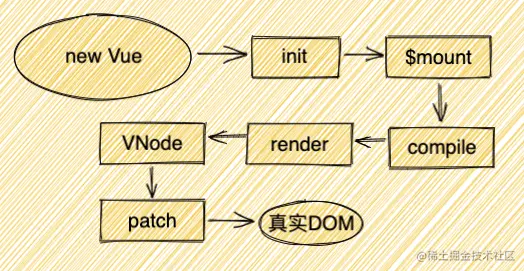
# keep-alive自身渲染
在上文keep-alive的组件源码中有一个abstract属性,这个属性就是vue中区分抽象组件和真实组件的关键点,如果他的值为true,则表示这是一个抽象组件,vue则不会将他渲染成真实dom,并且组件的实例链上也不会出现这个抽象组件
// src/core/instance/lifecycle.js

export function initLifecycle (vm: Component) {
  const options = vm.$options
  // 找到第一个非abstract的父组件实例
  let parent = options.parent
  if (parent && !options.abstract) {
    while (parent.$options.abstract && parent.$parent) {
      parent = parent.$parent
    }
    parent.$children.push(vm)
  }
  vm.$parent = parent
  // ...
}
2
3
4
5
6
7
8
9
10
11
12
13
14
15
# 包裹组件渲染
咱们再来说说被keep-alive包裹着的组件是如何使用缓存的吧。刚刚说了VNode -> 真实DOM是发生在patch的阶段,而其实这也是要细分的:VNode -> 实例化 -> _update -> 真实DOM,而组件使用缓存的判断就发生在实例化这个阶段,而这个阶段调用的是createComponent函数,那我们就来说说这个函数吧:
// src/core/vdom/patch.js

function createComponent (vnode, insertedVnodeQueue, parentElm, refElm) {
  let i = vnode.data
  if (isDef(i)) {
    const isReactivated = isDef(vnode.componentInstance) && i.keepAlive
    if (isDef(i = i.hook) && isDef(i = i.init)) {
      i(vnode, false /* hydrating */)
    }

    if (isDef(vnode.componentInstance)) {
      initComponent(vnode, insertedVnodeQueue)
      insert(parentElm, vnode.elm, refElm) // 将缓存的DOM(vnode.elm)插入父元素中
      if (isTrue(isReactivated)) {
        reactivateComponent(vnode, insertedVnodeQueue, parentElm, refElm)
      }
      return true
    }
  }
}
2
3
4
5
6
7
8
9
10
11
12
13
14
15
16
17
18
19
20
在第一次加载被包裹组件时,因为
keep-alive的render先于包裹组件加载之前执行,所以此时vnode.componentInstance的值是undefined,而keepAlive是true,则代码走到i(vnode, false /* hydrating */)就不往下走了再次访问包裹组件时,
vnode.componentInstance的值就是已经缓存的组件实例,那么会执行insert(parentElm, vnode.elm, refElm)逻辑,这样就直接把上一次的DOM插入到了父元素中。
# 总结
keep-alive组件用于缓存组件keep-alive不会渲染成真实dom,并且被包裹的组件通过$parent也无法访问到keep-alivekeep-alive内部维护了一个cache对象用于保存被缓存的组件的实例,同时也维护了一个keys数组保存被缓存的组件的key。并且通过LRU(缓存淘汰策略)算法对缓存组件进行更新keep-alive在卸载的钩子里会去遍历cache中的组件,逐一进行卸载LRU算法会把最新被访问到的数据提到数组尾部,数组中的顺序始终保持为最老的数据在头部,最新被访问的数据在尾部。